The Settings are an essential element of the Android device or tablet. They have everything you’ll need to set up and personalize the machine to suit your preferences. Opening the Android Settings may be easy, but there are certain issues, particularly when using a brand-new phone with a different version of Android. Learn this guide to understand how you can launch Settings on Android:
Note: I used an Android smartphone running Google Pixel 6a in this video guide: Android 14 and a Samsung Galaxy S23 equipped with One UI v6.0, based on Android 14. The steps will be the same on every Android device, meaning you’re good to go, even if you own a phone from Xiaomi, OPPO, Honor, Motorola, OnePlus, or any other brand. If you need to be certain of the exact version of Android that you’re running, these are the steps to determine it using your tablet or smartphone.
How to open General Settings
Open the Settings application on your Phone in different ways. Here, we have listed different ways to open General Settings on Android.
Method 1: Through the notification bar
The easiest way to access your settings is to use your notification bar. Scroll to the top of your Android screen to access your settings.

Please note: This only applies to Android version 4.0 or higher.
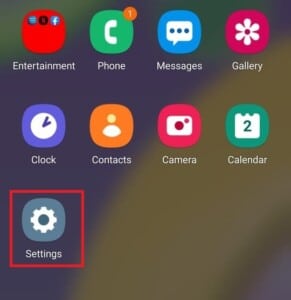
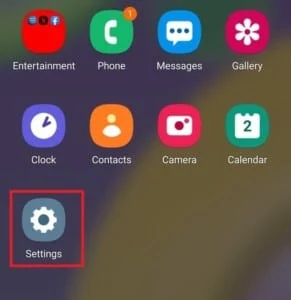
Method 2: Via App Drawer
The settings menu of your Android phone can be accessed by pressing the bottom of your Android device. This is where your applications are kept. In the menu, you will find options.
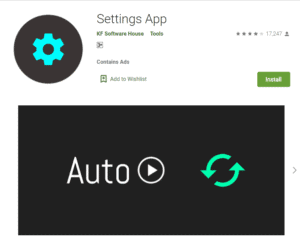
Method 3: Download a third-party settings app.
The app for setting preferences differs from your Android phone’s default Settings app. The app lets you modify each app’s settings, including changes to layout, volume, brightness, and more. It is possible to download the app through the Google Play Store.
How to Change Other Android Settings
Change the brightness settings
If you recently bought an Android phone and want to change the brightness of your Display. Follow these steps to change the brightness settings:
- Go to Settings.
- Tap Display.

- You can adjust the brightness slider according to your personal preference.
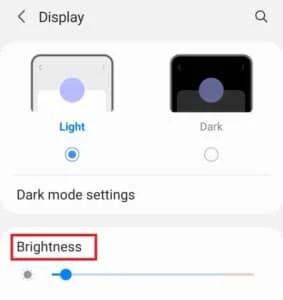
Please note that you can easily alter the intensity of your Display simply by dropping the upper part of your Android device and then adjusting the brightness slider by dropping it down.
Google Settings
Then, you must use the Google settings to alter the preferences and features that Google provides. Customizing and making changes to Google services, such as Google, for example, Google Assistant, Google Maps, Google Maps and so on.
Within the Settings screen, you can find an option to Google.
Select Google to see a variety of Google options.
Developer Options
Android Developer Options contains advanced settings that greatly impact device performance and design. The various stages of the Developer mode are unsuitable and accessible to regular users. If you want to alter multiple advanced functions, like the ability to root your Phone, app testing for development only requires device Developer Mode. Check out our guide on how to allow Android Developer Options.
When the “Developer options” are enabled on the device, you’ll get a quick message saying: “You are now a developer”. This allows you to use the features of Developer mode and choices for settings in Settings. Follow the steps below to access Developer options:
- Start the Settings app, then tap “Additional Settings” (in some devices, you can tap System). In this section, you’ll see Developer choices (mode).
- Turn on the toggle in the Developer Options section.
- You can now customize the options for advanced settings you’d like to use.
Notification Settings
Being notified on the Phone may be useful; however, they could be more appealing sometimes. If the number of apps you have installed on your Phone is lower than you would like, it’s likely to handle it. As the number of apps installed on your device increases, you get more overwhelmed by the number of notifications you get. You can choose which apps receive the messages and which do not. It is possible to set preferences for applications using notifications settings. Each Phone comes with distinct steps to set notifications.
- Go to Settings on your Phone.
- You will discover several options to set up notifications, such as managing reports.
- Select Manage Notifications and decide which apps will receive notifications and which ones will not.
- From the list of applications, you can enable the toggle switch on the right side of the app.
Network/Internet/ SIM Settings
If you want to alter any settings affecting Internet and network connectivity, you must go to the Wireless and Network settings. The latest models offer access to all locations for connection in the main screen of Settings, including Wireless-Fi Bluetooth, SIM card, mobile data, and contact and sharing. Changes can be made to the specific sections.
Change Keyboard Settings
If you’re not happy with your keyboard at present, switch it!
You may need to install another keyboard that you prefer. You must go to Settings, Language and Input> Keyboards and Input Methods to do this. If you find your new keyboard, click back to Language and input > default and choose the keyboard you would like to use.
Change Privacy Settings
In Google Settings. From within Google Settings, as mentioned in the previous paragraph, you can access settings (depending on the device you use) for security and Sign-in privacy, personal information and Privacy, and Account Preferences. Make sure you check them out.
In this section, you can choose not to participate in ad individualization, manage applications linked with your Google account, and manage location settings.
Disable Tracking Settings
Google likely knows your location and where you work. Google (and Apple, too) uses this data to make it easier for you to advertise. However, that doesn’t make the information any less disturbing.
To deactivate these features for Android, you must go into Settings > Location Access and remove “Google WiFi & mobile network location” or “Use Wireless Networks.”
Reduce Data Usage/Change Download Settings
If you do not enjoy unlimited data, you can block your Android from downloading updates and other large documents until you can connect to WiFi.
Go to the Settings menu > Battery & Data Manager, Data Saver, and select the appropriate box to enable it. Rewind to the first screen, then select “Data Delivery.”
You can disable “Background Data Delivery” and explore alternatives while browsing. When you change the settings of your Android smartphone, you can significantly reduce the amount of data you use.
Change Default App Settings
Suppose you are happier with the launcher included with the Android, which everyone else uses. It is possible to change it into an alternative. To switch your default applications, navigate to Settings > Apps and tap three dots in the upper right-hand corner.
Click on “Default Apps.” Here, you can change the default applications that the Phone uses for certain functions. Select the app you want to use in the app list that you’ve installed.
To delete a default application, you must go into Settings > Applications. Then, select the application you would like to remove. Select the app, then access the default app by selecting Clear defaults.
Hidden Nougat Night Mode Setting
This Night Mode feature cancels out the blue light emitted by the Android’s Display, enabling you to sleep better even when using your phone before bed. For this feature to be available, it is necessary to allow the UI Tuner. But note that most Android smartphones have this feature built into the System’s components.
You can lower the notification bar and press the Settings gear symbol to long-press. There should be an announcement when you’ve added UI Tuner. It’s located at the top of the Settings menu.
To get Night Mode, you also must install an application known as Night Mode Enabler and enable the application itself.
How can you find the most efficient way to access the options on your iPhone?
There are numerous methods of getting into the phone settings you use. All you need to do is look through the list of apps, then search for “Settings,” tap the icon, and you’ll be within your Phone’s settings.
What can I do to disable Android Developer Settings?
To activate Android’s developer mode, go to Settings > About Phone and select the Build number a few times until you can see you’re officially a developer! Once you’ve done that, go to Settings > Developer options, and then select those options you’d like to alter.
Conclusion
What are the most popular methods you’ve overcome problems simply by changing the option? What are some of the best ways to resolve issues by altering your preferences? You’ll need to change the available settings to customize the telephone you choose to suit your requirements.
Android smartphones let users navigate the settings menu, but you’ll find several options to familiarize yourself with.
Here is a checklist of the steps needed to access menu settings. These user guidelines will assist you in making adjustments to the settings on your Android tablet or smartphone. One of the greatest features is that you can download applications to simplify completing those tasks.
FAQ
How can I enable Android Developer Settings?
For Android to turn on its developer mode, you need to open Settings > About Phone and choose Build number several times until you notice that you have been made Developer! After that, you can open the Settings menu > Developer options. Select the options you’d like to alter.
What can I do to reset my network settings for Android?
Resetting the network settings is quite different depending on your device. For a Samsung handset, go to Settings, then select General Management > Reset Reset your network settings.