Cakes can be a great idea for any event and event, or meal. However, sometimes they might make it difficult to serve all. Cupcakes make it easy to have a small portion, but they also can get messy. With the advent of a recent market trend for silicone molds and glycerin, it’s now an easy task to make the cake into the cute single-serving form of cake pops!
As opposed to making them manually, cakes with mold can be made easily and taste great in the event that you master how to create these delicious desserts. So let’s learn to make cake pops using a mold!
What are the reasons to make cake pops by using mold?
You can indeed create cake pops using a mold! Here are a few of the top reasons to use molds as an ideal choice for creating cake pops.
The use of a mold guarantees that every cake will possess the exact shape and size that makes them appear consistent and professional.
Molds are available in a variety of forms, from traditional rounds to exciting and distinctive designs like hearts, stars, and even animals. These allow you to design cake pops that are truly unique.
Utilizing a mold, you can create multiple cake pops in one go, thereby making it easier to make them and saving time. Because the shape and size of each cake pop are identical and consistent, you’ll be able to ensure that every cake pop will have the same appearance and cook in a uniform manner.
Making cake pops using molds is an enjoyable task for everyone of any age, which makes it the perfect choice for family activities, events, and even a relaxing snack for an afternoon.
How to Make Traditional Cake Pops
There is a way to create a home-cooked cake. However, there’s no excuse to use an already-made cake mix that is packaged in a box. In order to enhance flavor and make a cake that is more solid pop, try adding a tiny amount (3.4 1 ounce) or pudding mix to the batter of your cake.
INGREDIENTS
- One cake mix box you like
- 1 (3.4 8 ounces) box of the pudding of your choice of flavor
- Four large eggs
- 1 cup of water
- 1/3 cup vegetable oils
- Half cup frosting (store purchased or made at home)
- 1 (12 1-ounce) bag of Candy melts (your option of the color)
- toppings (nuts, sprinkles, etc.)
DIRECTIONS
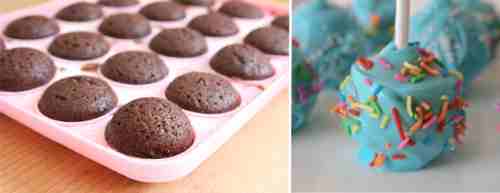
- Bake at 350°F. Spray the cake pans with non-stick spray.
- In a large mixing bowl, mix the mixture of cake, pudding, eggs, oil, and water.
- Mix at medium speed using the electric mixer for two minutes.
- Put the pan in the dish you have prepared.
- Bake for 35 to 40 minutes and until a toothpick placed inside emerges clear.
- In the pan, cool the cake for 10 minutes. Afterward, remove it from the pan, and allow to allow the cake to cool completely.
- Split the cake into two halves and freeze one half of the cake for the future.
- With your hands, break off the cake until big pieces are left.
- Mix frosting in by hand until it is well mixed.
FORM CAKE BALLS
- Make them into cakes and wait until they are set, around 2 hours.
- Miniature cake pops: one tablespoon cake ball (each approximately 1 1/4 inches in diameter) produces approximately 48 cake pops.
- Small cake pops: Two tablespoon-sized cake balls (each around 1 1/2 inches in diameter) produce around 24 cake pops.
- Large cake pops and three tablespoon-sized cake balls (each around 1 3/4 inches in diameter) yield about sixteen cake pops.
COATING:
As the cake balls are set in the oven, melt Candy Melts Candy according to the directions on the packaging. Dip the tips of every lollipop stick in Candy melts and then place it into the formed cake balls. Repeat the process for all cake balls. Allow them to set again for around 10 minutes. Reserve remaining melted Candy. Dip cake pops each at a time into the remaining Candy. Make sure to tap lightly to get rid of any excess. If necessary, warm the Candy by heating it with EZ Thin Dipping Aid or vegetable shortening in order to reduce the thickness for more easy dips. Then, cover it with sprinkles or a topping of your choice. Place on craft foam. Continue with the rest of the cake pops. Cool until firm, approximately 10-15 minutes.
Tips to Remember
Here are some suggestions for creating the perfect cake pops by using the help of a mold:
- To stop cakes from getting stuck to the mold, coat them with cooking spray or butter prior to making the cake batter.
- Avoid filling completely to prevent your cake pops from over-expanding and losing their form. Fill the mold 2/3 or 3/4 full to achieve optimal results.
- When you remove the cake pops out of the mold, allow them to cool to room temperature. It will be easy to get them off and will prevent the cake pops from breaking.
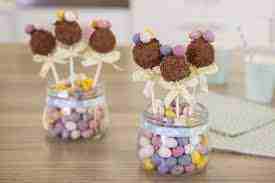
- Get a cake pop decorating stand so that you can decorate the pops more enjoyable. The stand will help keep your cake pops as you make the process of decorating, frosting, and other toppings much easier.
- You are free to be inventive in the toppings for your cake pops! You can try dipping them in melted chocolate and rolling them into sprinkles, or drizzle the tops with melted caramel for an exciting and tasty variation.
- Play around with food coloring to make colorful cake pops. You can experiment with different colors on each layer or add food coloring to the frosting for an exciting splash of color.
NUTRITION
Calories: 96kcal
Carbohydrates: 12g
Protein: 1g
Fat: 6g
Saturated Fat: 4g
Cholesterol: 8mg
Sodium: 54mg
Potassium: 36mg
Fiber: 1g
Sugar: 8g
Vitamin A: 12IU
Calcium: 19mg
Iron: 1mg
How do you store your cake pops?
The storage of cake pops is difficult, particularly if you need to ensure they are in good condition and look their best. Here are some straightforward and innovative tips for storing cake pops
Cake pops can be stored at room temperature in an airtight bag or a plastic container. This can help stop the cakes from becoming dry out and the decorations from discoloring.
If you would prefer to keep the cake pops in a fridge, cover them with plastic wrap or in an airtight container.