Learn how to construct an apron using this simple guide that comes with a printable apron design pdf for kids’ and adults’ sizes. What we call an apron has been in existence since the beginning of time and has been employed to safeguard clothing. Learning how to sew an apron by following this straightforward Aprons pattern is a fantastic method to master the art of making gifts for all occasions. One of the best things about sewing Aprons is that they are able to use them every day in the kitchen as well as for any other messy DIY project.
How can I create my own Apron?
It’s actually much simpler to design an apron than you think, particularly following this guide. This is one of the most basic designs of Apron that you can create. It’s ideal for a beginner sewing task.
However, it’s adorable! It would be a perfect (and cheap) gift idea for a loved one or family member who likes to bake, cook, or craft.
Do I require an apron pattern in order to design my own?
Nope! I’ll teach you how to build a very easy, pretty apron without a pattern. This is a breeze with only the measures.
DIY Apron Materials
- One millimeter of thick(ish) material
- scissors
- thread that is matched to the fabric
- A pencil or tailor’s chalk
- Cloth tape measures
- Sewing machine
What type of fabric should I pick for the aprons I make myself?
The ideal fabric to create a DIY Apron is one you already own If you can! The reason is that using fabrics that you already own will cut down on the amount of waste you’ll have and also save money.
If you decide to purchase fabrics or use what you have in your closet for fabric, medium to heavy-weight fabric is the best! Particularly since the Apron is only a single layer. Plus, thicker fabric means the liquids, paints, and so on will not be able to pass through your clothing beneath.
In general, you’ll require about 1 yard of fabric to make an apron such as this. It’s all about the measurements, or if you’d like something bigger, you could require a bit larger.
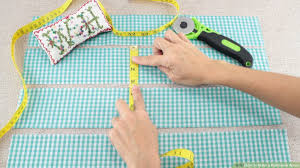
Fabric Cutting Layout
One of the best tips is to fold the fabric such that you have the edges meet in the middle instead of at the edges to cut smaller pieces of fabric. You will have an entire rectangle instead of scrappy bits. This can be used to make an apron for your child or a different kitchen gadget like oven gloves or perhaps a cozy tea.
The main part of the Apron’s body and the face is out of the meters of fabric by covering the longest edges of the main apron piece as well as the shortest edge of the face piece to the folded edge of the fabric. The image shows the fabric upside down in a row. However, you can fold it in the right direction in the manner that is usually suggested.
How do you stitch an Apron?
The pocket and straps use a length of 1/2 meter of fabric. The pocket must be cut in the fold, and you should remember that you should cut two waist straps.
Sewing the Apron
- Begin by stitching the seams of your underarms. The rough edge of the curving line to 3mm, then repeat the process 1.2cm then pin the seam into place. Fabric will stretch nicely over the curve, due because it was cut with a bias line because of the curve. Apply pressure from the left side.
- Then sew the straps. The straps should be folded in half lengthwise with the right sides facing each other and sew 1.5cm seams along all the way down the entire strap and along one side. An excellent tip for this is to sew a diagonal stitch around the corner between the stitching lines for a neat corner.
- Make sure you turn the straps around with the open end (this is sewn to a seam allowance in the future). It is possible to use an instrument for turning loops like this Clover one to make the task much quicker and simpler.
- The straps should be pressed, and then finish stitching the entire length of the sides to stop them from twisting during wear and washing.
- The neck strap should be placed between the left edge of the facing and the opposite edge of the Apron. Be sure that the seam of the strap is facing the other way, just behind the seam for the armhole of the Apron. Repeat this with the opposite side, making sure that the strap isn’t bent and the strap sits flush with the armhole seam on the Apron.
- Attach the stitch along the neckline, making sure your facing is overhanging the edge of the Apron by 1.5cm to the sides.
- Open the seam and reduce the seam on the Apron.
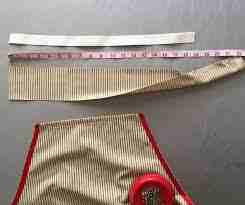
- Turn the seam of the facing toward the Apron to ensure that the facing is level free of the Apron. Place the facing onto the top of the Apron so that the left side of the facing faces the left-hand side of the Apron. Then join the ends with the longest lengths of the facing in the place they join – i.e., exactly where the pin appears in the image below.
- Flip the face back onto the other edge of the Apron. The face should be as follows after turning it over.
- Cut the excess straps of Apron diagonally in order to cut down on bulk. Take caution not to trim too closely to seams.
- Place the front facing onto the other edge of the Apron. Then push the raw edge to 3 millimeters.
- Secure the face to the straps and stitch it along one side, then across the length, and then the stitch return to the opposite side, joining the stitching line along the straps, i.e., 3mm from the edge.
- The edges of the Apron with 3mm, then 1.2cm
- Inject the edges of the raw edges of a waist strap inside the seam allowance near the uppermost point of the side seam. Fold it over and off the edge of the Apron, then fix it by securing it. Then stitch along the folded edge 3mm away from the fold.
- If you stitch across the strap, continue stitching until you have a square in which the strap is overlapping the Apron, and stitch it through the middle for the straps to be secured.
- Make sure to press the side of your pocket below 3mm, then 1.2cm, and sew it into place.
- Make sure to press the sides as well as the bottom edge to a depth of 1.5cm. It is not necessary to press the edges of the paper.
- Divide the Apron lengthways and draw the mid-point, and then put it in the pocket wherever you want to place it. Measure from the top edge of the Apron to the hem that is not finished Apron. You can then check the pocket is in a straight line.
- Secure the pocket by stitching it approximately 3mm away from the edge of the fold.
- Make a second row of stitching in a line parallel to the stitching along the edges, sewing squares that have crossed stitches in the top corner of the pockets. Ensure it is secured in a similar manner to how you made it to secure your waist belts.
- The hem should be pressed to 3 millimeters, and then 1.2cm, and then stitched to secure it.
- Just one final press and all you have to wrap is the gorgeous gift that you made yourself for your mum to be impressed!
CONCLUSION
Aprons are easy to create and require very small quantities of fabric, which means you are wonderful presents. Making an apron is an easy sewing task that is suitable for novices. Aprons are also easy to make if you wish to make apron sales, and also they are easy to customize if you are interested in gifting an Aprons.