If you’re a heavy user with between 20 and 30 tabs open, you must have sufficient memory to operate the browser efficiently. But, even with 16GB or 32GB of RAM, some users experience the error message “out of memory” for prominent browsers, such as Chrome, Edge, and Firefox. Memory leaks have been a major issue in the modern-day systems. Even Windows 11 has memory issues. To address the problem, we’ve created a step-by-step guide on repairing the error message leaking out of memory on Chrome, Edge, and Firefox.
Troubleshooting
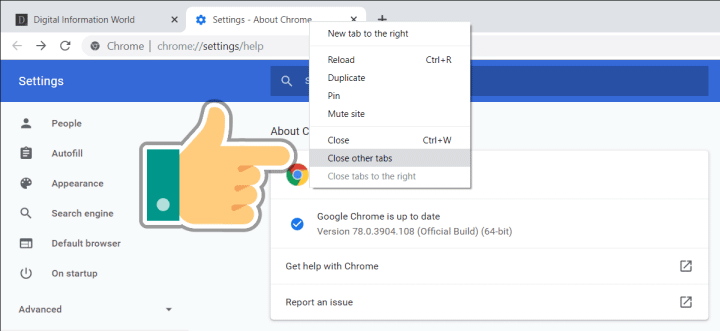
There isn’t enough memory in Google Chrome. Make sure to close all tabs besides the one that displays the error. Remove any other applications that could be in use. When you’ve finished everything, Try reloading the webpage with the error.
Also, you can close your browser and then open it. Close Google Chrome can release any memory and solve the problem if it stems from memory usage. It’s not a solution but rather an option to hack.
Updating to 64-bit
Check first if you are running one of the 64-bit versions of Google Chrome. That should be the first thing you check, particularly if you’ve got plenty of RAM to support Google Chrome. This 64-bit variant with Google Chrome is designed to utilize more memory. So when your Chrome displays this error despite having lots of memory, then this could be the cause.
You can follow the instructions below if running a 32-bit or 64-bit version.
- Open Google Chrome
- Chrome://chrome is the HTML0 code. Type it into the address bar, and then hit Enter.
- Choose the section titled “About” (if you haven’t yet)
- Verify that there are 64 bits in the version you’re using. Google Chrome version
- If no 64-bit version or 32-bit code is added following your version number, it’s not a 64-bit edition of Google Chrome.
- Download this version with 64 bits. At the moment, the 64-bit version is what you are using. Therefore, you do not need to change anything. Download the Google Chrome and install it.
- When you’re done, examine if the issue remains.
- Change Chrome’s version to 64-bit.
- Launch Google Chrome. Type chrome://settings/help in the address bar and press Enter. Check if you have a 64-bit display in the About tab after installing your Google Chrome.
Force Restart Chrome
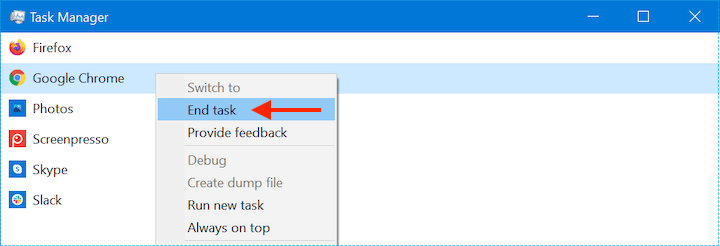
A more straightforward solution for fixing issues with Chrome is to reboot it. A Force restart via the Task Manager is far more successful.
- Hold the CTRL, Shift, and Esc keys together to launch The Task Manager.
- Make-sure-you’re-viewing-the-Processes-tab.
- Find Google Chrome and Right-click on it.
- Choose Stop Task in The dropdown menu.
Close Other tabs, extensions, and Applications
The computer you’re using may be running out of memory, which means it cannot load the website while simultaneously running app extensions, programs, or other applications.
Shut down any other applications or programs which are currently running. You can also put off any apps or downloads.
You are deleting unneeded extensions by removing them from Chrome.
CLEAR CHROME CACHE AND COOKIES
The accumulation of junk files in Google Chrome can increase the memory and web browser’s resource consumption on your PC. Removing these unwanted files could improve Chrome’s speed, using fewer resources from the Windows PC.
NOTE: Your browsing history and download history, cookies, and cache will be erased from Google Chrome; however, unless you choose them, passwords won’t be removed.
- Select the three dots icon on the toolbar, then select Settings.
- Click “Privacy and security”.
- Select ‘Clear browsing data. ‘
- Select the dropdown menu to select the Period and choose the Period you want to remove the browsing history.
- Now, click on precise data.
Switch off the hardware accelerator.
Google Chrome has a hardware acceleration feature lets it assign specific tasks to hardware. When trying to load a movie, it tells the GPU to take care of the charging instead of letting the CPU handle the job. The idea behind this feature is to take tasks off the CPU and consequently take pressure off it. It can help the system operate and complete tasks more quickly.
The hardware acceleration feature in Google Chrome works correctly for many people, but other users could have difficulties. There have been reports of users getting a Google Chrome Ran Out Of Memory error when the feature is enabled. If you’re experiencing this issue, you should turn off your Google Chrome to determine if this will assist.
Here’s how to do it:
- Open Google Chrome.
- Hit the three dots in the top right.
- Select Settings.
- Select Advanced from the left side panel.
- Click System.
- Turn off the switch. Utilize hardware acceleration if it is available.
Disable Chrome browser extensions.
An extension for a browser is a small part of software that could often be described as a “plug-in.” It performs several filtering and control options that alter how users can access websites or information via a website service, like an email service.
Extending a browser’s function often enhances a site’s current capabilities by adding new features and capabilities. They can also take away undesirable elements from a place, like pop-up ads or other parts of its essential functionality that the user wants to turn off.
If you’re fond of utilizing extensions within Google Chrome, one of them is the reason behind your issue. They can be disabled temporarily, and see whether Google Chrome typically works without these extensions.
Here’s how to do it:
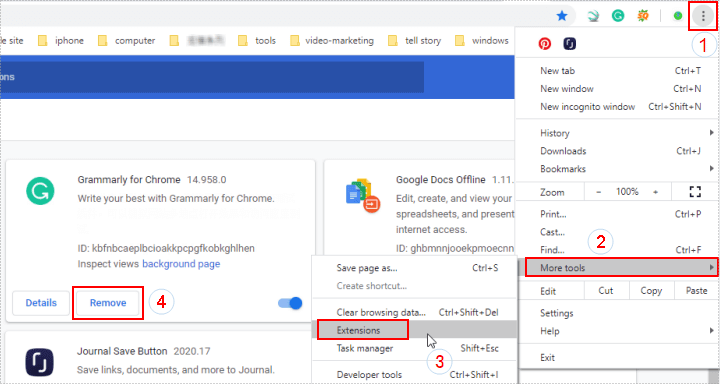
- Open Google Chrome.
- Just click on the three dots in the upper left.
- Click Here for Other Tools.
- Select Extensions.
- When the Extensions page is open, you can turn off each extension simply by turning off the switch related to the attachment.
- After that, it is recommended to quit Chrome and reopen it to check if the problem was resolved.
- You can return to the Extensions tab to remove the prior extensions if the issue is fixed. For this, select the Remove option on the confirmation dialog after you click to click the Remove button.
ENABLE VIRTUAL MEMORY
The Windows PC may also have the virtual memory feature, which will allocate a part of your hard drive as extra memory. This will increase the memory available to Google Chrome, thereby fixing the problem.
Read this tutorial to allow and expand the virtual memory available on your Windows PC.
Reset Chrome
Resetting Chrome can restore the browser’s standard settings. There are a lot of options to correct the error. Step below to reset Google Chrome and check if it is fixed.
- Open Google Chrome and go to chrome://settings/reset
- In red, Click the Restore settings back to their initial defaults.
- Confirm your actions by pressing to confirm your action and clicking the button to reset your Settings button.
- Then, restart the site and make sure that the problem is fixed.
REINSTALL GOOGLE CHROME
The most extreme option is to remove Google Chrome from your PC and reinstall it. It will delete all the files that the browser had previously saved. However, you can make some changes to your preferences through Google Sync. This is the last option when none of the other methods resolves the memory issue.
CONCLUSION
These tips provide a good starting point if you want to stop the memory issue with Google Chrome. Chrome is renowned as a power hog; following these tips will eliminate irritations. Ensure that your computer hardware can operate Chrome with no issues.